


Kubernetes is specially know for its auto-scaling and auto-healing features. Kubernetes is also known as "K8s" as it includes 8 letters between word Kuberenetes from K to s .
Why Kuberentes ?
Kubernetes provides efficient container orchestration, scalability, high availability, portability, resource optimization, and supports modern development practices, making it a preferred choice for managing containerized applications in diverse environments. So thats the reason we prefer Kubernetes.
Auto-Scaling
We all have nail bitting moment during the Ipl matches and World Cup, as we see the number of users grow at the crucial moment of the Match or when M.S Dhoni comes to bat we see the sudden growth in the viewership of Audience watching Cricket at that moment of time. This huge traffic is controlled by use to Autoscaling, the App automatically Auto-scales if the demand is more by using the Auto-scaling feature of Kubernetes.
Auto-Healing
Kubernetes monitors the health of pods and nodes within the cluster continuously.
If a pod crashes or becomes unresponsive due to issues like software bugs or resource constraints, Kubernetes automatically restarts the pod to restore service availability.
Get Information:
1. kubectl get pods
kubectl get pods is used to list all the pods currently running within the cluster. It provides information such as pod names, statuses, and creation times, allowing administrators to quickly view the state of pod deployments.
kubectl get pods -n <namepace-name>
kubectl get pods -n <namepace-name> - o wide : Shows the information of the pods in detail
2. kubectl get svc
kubectl get svc is used to list all the services currently running within the cluster. It displays information such as service names, cluster IPs, and exposed ports, providing administrators with an overview of the available services and their configurations.
3.kubectl get deployments
kubectl get deployments is ussed to list all the deployments currently managed within the cluster. It provides information such as deployment names, desired replica counts, current replica counts, and available update strategies, giving administrators visibility into the state and configuration of their deployments.
4. kubectl describe
kubectl describe <resource> <name>: Show detailed information about a specific resource.
5. kubectl cluster-info
kubectl cluster-info: Display information about the cluster.
Manage Resources
6.kubectl create -f
kubectl create -f <file.yaml>: Create resources defined in a YAML file.
7. kubctl create namespace
kubectl create namespace <namespace-name>: Create a new namespace.
8.kubectl apply -f
kubectl apply -f <file.yaml>: Create or update resources defined in a YAML file.
9.kubectl delete
kubectl delete <resource> <name>: Delete a specific resource.
10.kubectl delete -f
kubectl delete -f <file.yaml>: Delete resources defined in a YAML file.
Inspect Logs
11.kubectl logs
kubectl logs <pod-name>: Print the logs of a specific pod.
12.kubectl logs -f
kubectl logs -f <pod-name>: Stream the logs of a specific pod.
Exec into Pod
13. kubectl exec -it
kubectl exec -it <pod-name> -- /bin/bash: Start an interactive shell session inside a pod.
Port Forwarding
14.kubectl port-forward
kubectl port-forward <pod-name> <local-port>:<pod-port>: Forward a local port to a port on a pod
Scaling
15.kubectl scale deployment
kubectl scale deployment <deployment-name> --replicas=<replica-count>: Scale the number of replicas in a deployment
kubectl scale deployment reddit-clone-deployment --replicas=4 -n reddit
Basics
Kubernetes Architecture

Master Node
The Kubernetes master node is the central control unit of a Kubernetes cluster. It manages the cluster's overall state and includes components such as the API server (for communication), etcd (for data storage), kube-controller-manager (for maintaining system state), and kube-scheduler (for workload distribution)

Worker Node
The Kubernetes worker node is a part of the cluster responsible for running application workloads. It hosts containers within Pods and communicates with the master node. Key components include the Kubelet (manages containers on the node), Kube-proxy (maintains network rules), and a container runtime (e.g., Docker). The worker node executes tasks assigned by the master, ensuring applications run as intended.
Pod
Pods are the smallest deployable units of computing that you can create and manage in Kubernetes.
The following is an example of a Pod which consists of a container running the image nginx:1.14.2.
apiVersion: v1
kind: Pod
metadata:
  name: nginx
spec:
  containers:
  - name: nginx
    image: nginx:1.14.2
    ports:
    - containerPort: 80
For more details refer Pods
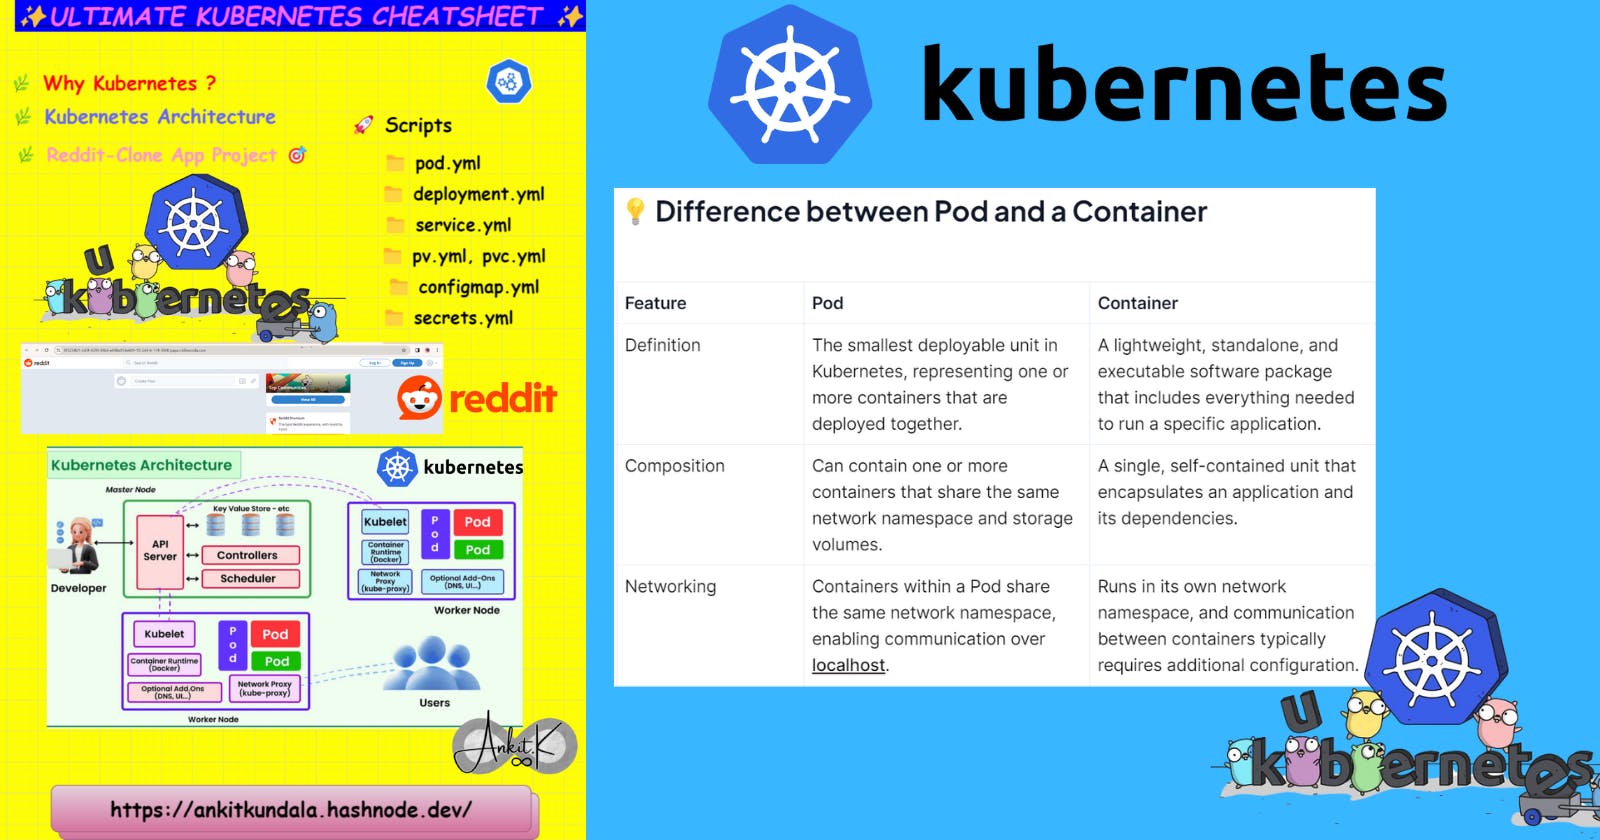
💡Difference between Pod and a Container
| Feature | Pod | Container |
| Definition | The smallest deployable unit in Kubernetes, representing one or more containers that are deployed together. | A lightweight, standalone, and executable software package that includes everything needed to run a specific application. |
| Composition | Can contain one or more containers that share the same network namespace and storage volumes. | A single, self-contained unit that encapsulates an application and its dependencies. |
| Networking | Containers within a Pod share the same network namespace, enabling communication over localhost. | Runs in its own network namespace, and communication between containers typically requires additional configuration. |
| Use Case | Used to encapsulate and manage closely related application components that need to run together and share resources. | Represents a single application or service that can be deployed and executed independently. |
| Scaling | Pods are typically scaled to meet the demand for the entire application or service. | Containers are scaled individually, which may not provide the necessary coordination for related components. |
So, When High traffic arrives on the App, we need to scale the Application for its smooth functioning and this is done by deployment.yaml.
Deployments
A Deployment provides declarative updates for Pods and ReplicaSets.
We can define Deployments to create new ReplicaSets, or to remove existing Deployments and adopt all their resources with new Deployments. Also used as Create a Deployment to rollout a ReplicaSet,Rollback to an earlier Deployment revision if the current deployment is not stable.
The following is an example of a Deployment. It creates a ReplicaSet to bring up three nginx Pods:
apiVersion: apps/v1
kind: Deployment
metadata:
  name: nginx-deployment
  labels:
    app: nginx
spec:
  replicas: 3
  selector:
    matchLabels:
      app: nginx
  template:
    metadata:
      labels:
        app: nginx
    spec:
      containers:
      - name: nginx
        image: nginx:1.14.2
        ports:
        - containerPort: 80
For more details refer Deployments
Service
In Kubernetes, a Service is a method for exposing a network application that is running as one or more pods in your cluster.The Service API, part of Kubernetes, is an abstraction to help you expose groups of Pods over a network. Each Service object defines a logical set of endpoints (usually these endpoints are Pods) along with a policy about how to make those pods accessible.
apiVersion: v1
kind: Service
metadata:
  name: my-service
spec:
  selector:
    app.kubernetes.io/name: MyApp
  ports:
    - protocol: TCP
      port: 80
      targetPort: 9376
  type: NodePort
For more details referService
So we require two yaml files ie ,deployment and service files to partially Deploy an Application, later on we can add Persistent Volume, persistent volume claim and Secrets file to make App the in Stated-form.
Persistent Volumes & Persistent Volume Claim
Managing storage is a distinct problem from managing compute instances. The PersistentVolume subsystem provides an API for users and administrators that abstracts details of how storage is provided from how it is consumed. To do this, we introduce two new API resources: PersistentVolume and PersistentVolumeClaim.
Here is a simple example of a Persistent Volume and Persistent Volume Claim YAML:
# Persistent Volume
apiVersion: v1
kind: PersistentVolume
metadata:
  name: example-pv
spec:
  capacity:
    storage: 1Gi
  accessModes:
    - ReadWriteOnce
  hostPath:
    path: /your/host/path

# Persistent Volume Claim
apiVersion: v1
kind: PersistentVolumeClaim
metadata:
  name: example-pvc
spec:
  accessModes:
    - ReadWriteOnce
  resources:
    requests:
      storage: 1Gi
For more detail referpv&pvc
ConfigMaps
A ConfigMap is an API object used to store non-confidential data in key-value pairs. Pods can consume ConfigMaps as environment variables, command-line arguments, or as configuration files in a volume.
Here's an example ConfigMap that has some keys with single values, and other keys where the value looks like a fragment of a configuration format.
apiVersion: v1
kind: ConfigMap
metadata:
  name: game-demo
data:
  # property-like keys; each key maps to a simple value
  player_initial_lives: "3"
  ui_properties_file_name: "user-interface.properties"

  # file-like keys
  game.properties: |
    enemy.types=aliens,monsters
    player.maximum-lives=5
  user-interface.properties: |
    color.good=purple
    color.bad=yellow
    allow.textmode=true
For more details referConfigMaps
Secrets
A Secret is an object that contains a small amount of sensitive data such as a password, a token, or a key. Such information might otherwise be put in a Pod specification or in a container image. Using a Secret means that you don't need to include confidential data in your application code.
apiVersion: v1
kind: Secret
metadata:
  name: dotfile-secret
data:
  .secret-file: dmFsdWUtMg0KDQo=
---
apiVersion: v1
kind: Pod
metadata:
  name: secret-dotfiles-pod
spec:
  volumes:
    - name: secret-volume
      secret:
        secretName: dotfile-secret
  containers:
    - name: dotfile-test-container
      image: registry.k8s.io/busybox
      command:
        - ls
        - "-l"
        - "/etc/secret-volume"
      volumeMounts:
        - name: secret-volume
          readOnly: true
          mountPath: "/etc/secret-volume"
For more details referSecrets
Reddit-Clone App Project 🚀
So, we need to install the Kubernetes on our system and setup both the Master and worker node, to save some time I have used k8s playground named Killer Koda which has already kubernetes setup we just need to run our projects.
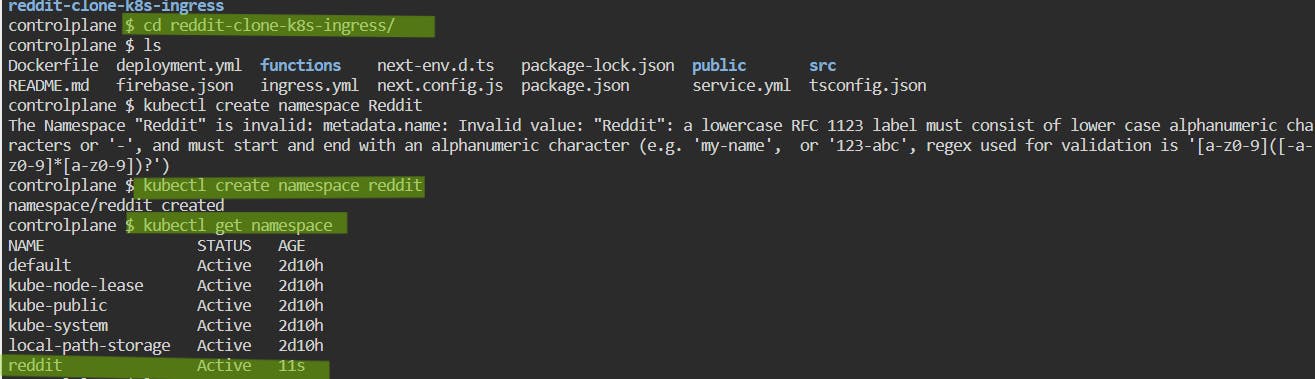
1. Lets make a directory named projects and clone your github project repositry Reddit-clone-App .

Change directory to the reddit-clone-k8s- ingress an create a namespace and check the created namespace.
kubectl create namespce redditkubectl get namespace
After this we will Deploy the deployment.yml service.yml, and ingress.yml files and verify the proper running of these deployments.
kubectl apply -f deployment.yml -n reddit&kubectl get deployment -n redditkubectl apply -f service.yml -n reddit&kubectl get svc -n redditkubectl apply -f ingress.yml -n reddit&kubectl get ingress -n reddit

Expose the port and do the port forwarding.
kubectl expose deployment reddit-clone-deployment -n reddit --type=NodePortkubectl port-forward svc/reddit-clone-service -n reddit 3000:3000 --address 0.0.0.0
Open the port 3000 and Hit the url.
Edit the port to 3000 and click on the Access Button, a new tab will be opened where the App is running !


As we can say the App is successfully running , Hurray !!!
We have Successfully Deployed the Reddit-Clone-App in 5 simple steps.
Helm
Helm is a package manager for Kubernetes that simplifies the process of deploying, managing, and scaling applications in Kubernetes clusters. It provides an easy way to define, install, and upgrade applications, along with their dependencies, using pre-configured package charts.
Instead of writing all the yaml we get the templates, we just have to Configure the name and other parameters and we are done.
Install Helm through this.
curl https://baltocdn.com/helm/signing.asc | gpg --dearmor | sudo tee /usr/share/keyrings/helm.gpg > /dev/null
sudo apt-get install apt-transport-https --yes
echo "deb [arch=$(dpkg --print-architecture) signed-by=/usr/share/keyrings/helm.gpg] https://baltocdn.com/helm/stable/debian/ all main" | sudo tee /etc/apt/sources.list.d/helm-stable-debian.list
sudo apt-get update
sudo apt-get install helm
More helm projects will be uploaded in the upcoming Project Series.
Thanks for Reading the Blog! Feel free to share your thoughts over it.
Github Repositry :
Reddit-clone-App (Shubham Londhe)